Settings - Email settings
The Settings dialog is opened by pressing shortcut key CTRL+S or via menu Options->Settings.
Remember to always press Apply button after editing settings! New settings will not take effect until after the Apply button has been pressed.
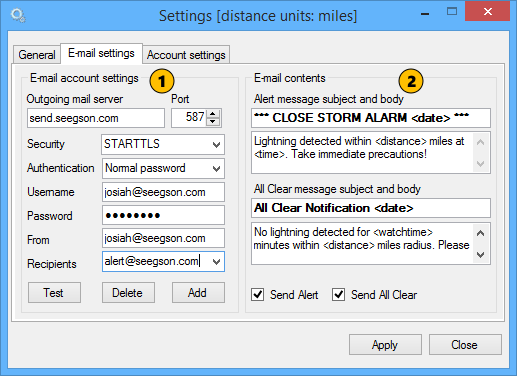
1. Email account settings
Set up mail server, credentials and alert message recipients. If in doubt, contact your IT support or network administrator to obtain correct settings.
Outgoing mail server: Enter your SMTP mail server address here.
Port: Set the SMTP port for the mail server.
Security: Select security option. Most e-mail servers today are compatible with STARTTLS
Authentication: Select authentication method. With STARTTLS this option should be set to Normal password
Username: Your e-mail account username
Password: Your e-mail account password
From: The e-mail address that will be shown as From in the e-mail message header. This should be a valid address associated with your e-mail account.
Recipients: Add or remove recipients of StormStation 5 alert messages.
-Add new recipient: Enter an e-mail address and press Add button
-Remove recipient: Select e-mail address to remove from the drop down list and press Delete button
To test e-mail alerting functionality, press Test button. A pop-up dialog will inform you if the message was sent successfully or not. A successful test transmission means that the mail server settings are configured correctly and communication with the server is working. It does not guarantee that all the recipient addresses are correct.
Note: Everyone on the recipients list will receive test messages. It is recommended that you test with one recipient and add more recipients after the e-mailing function is confirmed to be working.
Note: StormStation 5 does not have an upper limit on number of recipients. However, if more than 30 recipients are added you will receive a performance warning. It is preferred to use a mailing list if the number of recipients is large. In such a scenario StormStation 5 would send one e-mail to a mailing list which in turn dispatches this message to any number of recipients. This way the bulk of the e-mailing work is offloaded to an external application built for the purpose.
Using Google Gmail
StormStation 5 e-mailing feature will work with Gmail after a special option is enabled in your Gmail account settings.
- Log in to your Gmail account, select Settings and then Accounts and Import option.
- Locate and click on Other Google Account settings link
- Locate 2-Step Verification option and make sure this is set to Off
- Locate Access for less secure apps and change this to Allowed
With this change completed you can now use your Gmail account for sending StormStation 5 alerts using the following settings:
Outgoing mail server: smtp.gmail.com
Port: 587
Security: STARTTLS
Authentication: Normal password
In addition to the above you also have to enter your Gmail credentials in Username/Password and From.
Do not forget to click Apply button after editing settings!
2. Email contents
Here you can change the alert and all clear messages subject and content. Place the cursor on the respective text box and change the text as necessary.
Special tags allow you to insert current data such as date and alarm range. The available tags are:
- <date> - Insert full date and time
- <time> - Insert time
- <distance> - Insert the close alarm radius
- <watchtime> - Insert the current Watch period
Send Alert option: Enable and disable sending of close lightning alert e-mails
Send All clear option: Enable and disable sending of close lightning alert e-mails
Note: If close alarm is disabled no alert messages will be sent! Also, if Send Alert is disabled no All clear messages will be sent.